How to make a homemade generator
Making a homemade generator at home?
Yes, you need to prepare some knowledge of electricity. Then is the basic knowledge application.
There are two types of knowledge for building (self-made) generators:
All of them can help you build a generator to supply electricity for your family, or a generator for learning.


Many people are asking how to generate homemade electricity without any kind of fuel. People are becoming very interested in this question for a number of reasons. But the most important reasons are due to the rising costs of electricity and global warming. Everybody is aware that the bulk of our energy comes from power plants using fossil fuel. Any kind of increase in the world price of oil will undoubtedly increase the cost of electricity.
References:
1. How to Make a Simple Electric Generator: https://m.wikihow.com/Make-a-Simple-Electric-Generator
2. Homemade Electric Generator: https://homemade-generator-tao.blogspot.com/2019/11/homemade-electric-generator.html
3. Are free energy generators fake or real? https://www.quora.com/Are-free-energy-generators-fake-or-real
Yes, you need to prepare some knowledge of electricity. Then is the basic knowledge application.
There are two types of knowledge for building (self-made) generators:
- Electrical knowledge of mainstream science - school
- Electrical knowledge of non-mainstream science
All of them can help you build a generator to supply electricity for your family, or a generator for learning.
A. Prepare knowledge to build a homemade generator
Here, we intend to build an alternating current generator. Therefore, the knowledge that needs to be prepared is AC.
- Principle: Electromagnetic induction.
- What is needed: Variable magnetic field - kinetic energy source
- See more details about alternating current knowledge here: How does a homemade generator work
In addition, if it is DC power, you can learn knowledge about solar energy, chemical batteries, and in particular: Earth Battery.
B. Practice - make a homemade generator
#1 How to Make a Simple Electric Generator
Electric generators are devices that use alternating magnetic fields to create a current through a wire circuit. While full scale models can be complex and expensive to build, you can create a simple electric generator easily. All you need to do is create a simple frame to hold the wire and magnet, wind the wire, connect it to an electrical device, and glue the magnet onto a spinning shaft. This even works well to teach electromagnetic properties, or display as a science project.
Building the Frame
1. Cut the cardboard. Cardboard will serve as the frame and support for your simple generator. Use a ruler to measure a cardboard strip that is 8 centimetres (3.1 in) by 30.4 centimetres (12.0 in). Cut this strip out with scissors or a utility knife. This single piece will be folded to form the frame.[1]

2. Mark the cardboard. Use a ruler to measure along the length of the cardboard. Make your first mark at 8 centimetres (3.1 in). Your second mark should be at 11.5 centimetres (4.5 in), and your third mark should be at 19.5 centimetres (7.7 in). The final mark will be at 22.7 centimetres (8.9 in).[2]
This creates segments of 8 centimetres (3.1 in), 3.5 centimetres (1.4 in), 8 centimetres (3.1 in), 3.2 centimetres (1.3 in), and 7.7 centimetres (3.0 in). Do not cut these segments.

3. Fold the cardboard. Fold the cardboard along each mark. This will make your flat piece of cardboard into a rectangular frame. This frame will house the components of your electric motor.[3]

4. Slide the metal shaft through the support frame. Push a nail through the center of the cardboard frame. Make sure you go through all three pieces of cardboard that are folded into the center. This will create the hole for your shaft. You can now insert a metal shaft, or use the nail as your shaft.[4]
The metal shaft does not have to be anything in particular. Any piece of metal that will fit through the hole and come all the way out the other side of the frame is acceptable. The nail you use to make the hole will work perfectly.

Creating the Circuit
1. Wind the copper wire. Make several turns around the cardboard box with enamel coated copper wire (#30 magnet wire). Wind 200 feet (61 m) of wire as tight as you can. Leave about 16 to 18 inches (40.6 to 45.7 cm) of wire loose on each end to connect to your meter, light bulb, or other electronic device. The more "turns" or winds you make around the cardboard frame, the more power your generator should produce.[5]

2. Strip the ends of the wire. Use a knife or a wire stripper to remove the insulation from each end of the wire. Remove about 2.54 centimetres (1.00 in) of insulation from each side. This will allow you to connect the wire to an electronic device.[6]

3. Connect the wires to an electronic device. Attach the two wires you have loose at the ends of the windings to a red LED, #49 miniature bulb, or a 1.5V grain-of-wheat lamp. Or, connect the test leads from an AC voltmeter or multimeter to them. Keep in mind that you are producing a very low voltage, and larger devices (e.g. a regular light bulb) will not be powered by this generator.[7]

Setting the Magnets
1. Glue the magnets to the shaft. Use a high strength hot melt glue or epoxy to glue four ceramic magnets to the shaft. You want the magnet to be stationary with respect to the shaft. The magnets should be glued onto the shaft after the shaft has been inserted into the frame. Allow the glue to dry for several minutes (the instructions on the container can tell you exact drying times for your type of glue).[8]

For best results, use 1x2x5 cm ceramic magnets (these can be found online for a reasonable price). Glue them so that two magnets are facing the coil with their north side, and two are facing the coil with their south side.
2. Turn the shaft with your fingers. This allows you to see if the ends of the magnets hit the inside of the frame. The magnets must turn freely, but as close as possible to the walls of the frame. Again, having the magnet's ends as close the copper wire windings as possible will increase the "exciting" action of the magnetic fields the magnet produces.
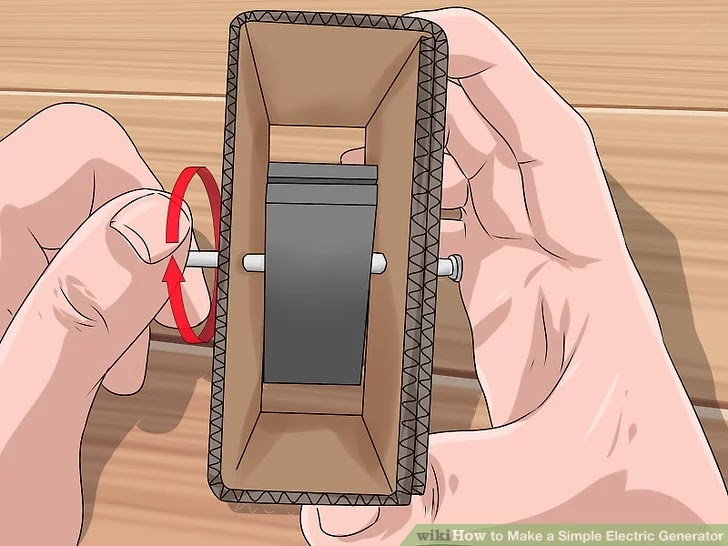
3. Spin the shaft as fast as possible. You may want to wind a string around the end of the shaft, then pull it sharply to turn the magnets. You could even just spin it with your fingers. As the shaft turns, you should get a small voltage (enough to light a 1.5 volt light bulb).[10]

You could improve the power output by putting a pinwheel on the end of the shaft and connecting it to an electric fan to turn the wheel. Keep in mind that this is only good to demonstrate the operation of the generator since you use more electricity turning it than you create.
Of course, all of the above is useless if you don't know how to put all the pieces together. I strongly recommend investing a small amount in a reliable set of tried and tested plans. By all means, you will get a heck of an education if you go it alone and tinker with your motor in the years ahead. But if you would prefer to be up and running in days rather than weeks or months then I strongly recommend getting some plans. You actually lose more money if you go it alone and continue to keep paying your bills in the meantime. More Details: Homemade Generator Plans - Top 6 Ways to Generate Your Own Power
#2. Make a homemade generator for Home
Homemade Generator Plans:
Many people are asking how to generate homemade electricity without any kind of fuel. People are becoming very interested in this question for a number of reasons. But the most important reasons are due to the rising costs of electricity and global warming. Everybody is aware that the bulk of our energy comes from power plants using fossil fuel. Any kind of increase in the world price of oil will undoubtedly increase the cost of electricity.
Homemade Generator Plans: Top 6 Ways to Generate Your Own Power
Make a homemade generator
To export for you to make a homemade generator:
Revealed At Last: Ancient Invention Generates Energy-On-Demand
The design includes:
The design includes:
- Harnessing electricity from the Earth: Neither is Schumann Resonance, nor is it known by Electromagnetism. It's The Sea of Energy in Which the Earth Floats
- Extracted from ordinary electricity by the method called “fractionation.”
- Reverse Tesla coil - "Back to Back" mechanism
- Combination of radiant energy and negative resistance to amplify electricity
- Nikola Tesla’s method of magnifying electric power by neutralizing the magnetic counter-forces in an electric generator
References:
1. How to Make a Simple Electric Generator: https://m.wikihow.com/Make-a-Simple-Electric-Generator
2. Homemade Electric Generator: https://homemade-generator-tao.blogspot.com/2019/11/homemade-electric-generator.html
3. Are free energy generators fake or real? https://www.quora.com/Are-free-energy-generators-fake-or-real
4. Electric generator: https://en.wikipedia.org/wiki/Electric_generator
How to make a homemade generator
 Reviewed by BiT
on
7:52 PM
Rating:
Reviewed by BiT
on
7:52 PM
Rating:
Reviewed by BiT
on
7:52 PM
Rating:


No comments: